IT'S ALL IN YOUR HEAD - FINAL YEAR PROJECT COLLECTION PT.2
Week 1 (26/04/2024) - Week 14 (26/07/2024)
Faith Aimee Choong Jia Yi / 0345509
Fashion Design Technology Final Project 2 [DST63704]
It's All In Your Head [Final Year Project Collection Pt.2] : Continuous Assessment
_________________________________________________________________________
POWERPOINT SLIDES
PROGRESS BEGINS!
___________________________________________________
LOOK #1
DESIGN:
TECHNICAL DRAWING:
For Look #1, I had to readjust the fit of the bodysuit and also draft the torn skirt pattern. I also did a quick toile of the bodysuit to test the fit.
After finalizing the bodysuit pattern, I cut out the pattern on my digitally printed fabric. I did an outer and inner pattern piece because I wanted a clean finish on the edges so I decided to make a facing on the inside.
BODYSUIT [FITTING]
As for the skirt, I drafted the shape of how the skirt will be shaped and fitted. I tested out the fit by using leftover organza fabric to test the fit before proceeding to make the torn textures and arc shapes for the solid manipulation.
LOOK #2
DESIGN:
TECHNICAL DRAWING:
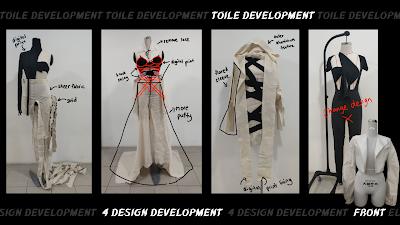
Next is Look #02, I had to redo and remove a few elements from this design as my previous toile contained lace at the bralette and a knee slit from the skirt.
For the bodysuit element in this design, I readjusted the design of the bodysuit by making it simpler. I just used the black strings to make a criss-cross shape on the mannequin's body. I did a quick toile, to check the fit.
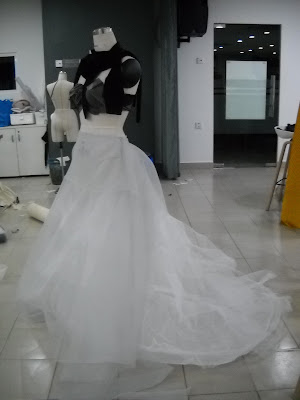
I wanted to make the wedding skirt more puffy so I made a crinoline inner to make it puffy and bouncy as the model walks. This crinoline has a long train at the end that points like a fishtail.
I layered the crinoline with organza and also adding a double layer at the bottom.
BODYSUIT + WEDDING SKIRT [FITTING]
LOOK #3:
Before starting on the actual, I did a quick toile on my base and tested out the black strings by sewing them onto the garment, to test the fit because it is supposed to be a fitted look. I readjusted my patterns and proceeded to cut them.
After, finishing the toile I started on my Look #03. I needed to refer back to my toile to see where each string was positioned. Below is my reference photo.
 |
I also had to readjust the hood pattern piece as it was too pointed at the top. I also did a quick toile to test the fit on the user's head.
My hood piece contains my manipulations. Which is aluminum fused with silver fabric. This creates a crumpled texture in relation to my theme.
LOOK #03 [FITTING]
LOOK #03 WITHOUT HOOD [MODEL FITTING]
 |
| Close Up |
LOOK #4:
DESIGN:
TECHNICAL DRAWING:
I had to draft a whole new design for this look as I didn't like my previous design.
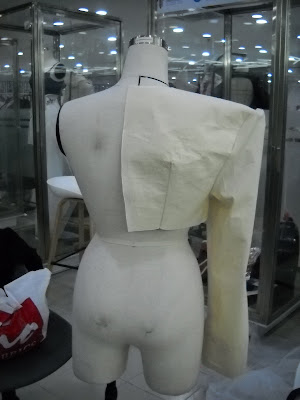
I started off by draping the jacket piece. I wanted to make that bold shoulder silhouette, so I used shoulder pads to create the shape and draped Calico over it to get the pattern. I did a quick toile to test the fit and see if the shape holds.
I draped a block of shoulder pads on the shoulder of the mannequin, to make the shape of the jacket. Then I drape the calico over it to make the pattern. After draping, I trace the pattern on paper.
After the fit is completed, I move on to making the jacket on the actual fabric. I cut the pattern out on my actual fabric. I also cut out the jacket interfacing and interfacing for the aluminium texture.
Jacket look. I didn't sew the sleeves yet because the fabric material is quite stiff therefore I need to figure out how to sew the sleeves with the lining without having a hard time to flip the fabric out, back to front.
Next I had to readjust the bodysuit pattern and also draft some new pieces. I did a quick toile to test the fit.
LOOK #5
DESIGN:
TECHNICAL DRAWING:
For Look #05, I drafted both the top and pants pattern on paper and did a toile to test the fit. The top and bottom patterns are basic but the top had some details as well as the pants opening. I also added the aluminum manipulation on the bodice and sleeve to see which looked better and more comfortable for the model.
PUFFER TOP JACKET [FITTINGG]


_20240728_221722_0004.png)


_20240728_221722_0009.png)


_20240728_221722_0013.png)


_20240728_221722_0020.png)

_20240728_221722_0022.png)

_20240728_221722_0024.png)
_20240728_221722_0025.png)
_20240728_221723_0026.png)
_20240728_221723_0027.png)
_20240728_221723_0028.png)
_20240728_221723_0031.png)


.jpg)


.jpg)


.jpg)


Comments
Post a Comment