FINAL PROJECT: FUNCTIONAL GARMENT
Week 7 (11/10/2022) - Week 14 (29/11/2022)
Faith Aimee Choong Jia Yi / 0345509
Innovative Pattern Drafting Project [DST63804]
Final Project: Functional Garment

LECTURE [11/10]
In today's lecture, Mr Riza briefed us on our final project which is to make our designs into actual garments from the Digital Health Fashion Technology project. Mr Riza advised us to make multifunctional garments.
Multifunctional garments are garments that can be transformed into many silhouettes and shapes. They also serve as multifunctional for users as they can be transformed into jackets, skirts, pants and etc.
FINAL PROJECT
We are to produce 4 garments in total, designs from our Digital Health Fashion Technology project, using any techniques or methods to complete these garments whether it is deconstruction, pattern plotter and etc.
TECHNICAL DRAWING
Outer:
 |
| Design 01 |
 |
| Design 02 |
 |
| Design 03 |
 |
| Design 04 |
Inner:
 |
| Inner Top |
 |
| Inner Dress |
PROCESS
To begin, I consulted with Mr Riza on my designs. In my previous consultation session with Ms Maria, she chose for me to proceed with these 4 designs.

Mr Riza, told me to start off with my device garment which is the inner garment. He recommends using a draping method so that the lines can be seen clearly but also at the same time doing the technical drawing for the inner garment.
Firstly, I drape the mannequin with draping tape, following the sizes and structure of the inner garment.
 |
| Left Side |
 |
| Back |
 |
| Right Side |
 |
| Front |
And later draping Calico fabric all over it to create the pattern. Mr Riza advised me to make the full bodycon dress first and then only add the curved line at the waist for the other inner tops.
 |
| Front |
 |
| Left Side |
 |
| Back |
 |
| Right Side |
I used the digital scanner to copy the pattern panel into Modaris, and added any necessary seam allowances, grainlines and notches. After scanning each of the panels, I moved to Diamino to set up the pattern so that it will be able to print through the digital printer. I printed out my pattern panels and cut each piece up.


For this inner top, I used cotton lycra, because the top needed to be fitted onto the user so therefore I thought of using cotton lycra since it was stretchable and fitting to the chest.
After completing my first top, I notice that the garment is quite fitting therefore it doesn't need the strap at the sides. Instead, I used the straps on the right side of the garment so that it holds up the garment evenly on the shoulders.
 |
| Back |
 |
| Front |
 |
| Side |
I had a short meeting with the engineering students physically. They wanted to show me the prototype so that I get a better idea of what it looked like and where the device will be on the body.

They gave me the ECG device so that it will help me in making the device fit onto the garment.
However, they notified me that they had this box, which is where the chip is going to be placed along with a screen that shows the data. I thought of two ways to implement this pocket into my garment. One would be to make a rectangular pocket so that the device can just be placed inside, and the fabric will hold the corners. Two would be to make a transparent pocket so that the box can be slipped through inside.
I haven't made the actual technical drawing for my four designs, however, I made notes on how to construct the garment.

DESIGN #01
For my 1st design, the inner top is a dress.
 |
| Front |
 |
| Back |
I started constructing the first garment using dark blue blazers with a mixture of black dual-tone fabric which I bought for the 3rd design. I started to dismantle the two dark blue blazers and drape them over the mannequin to get the expected silhouette in my design.
 |
| Front |
 |
| Back |
After completing the garment, I did a fitting session with my model, to check if the garment fits.
 |
| Front |
 |
| Back |
 |
| Side |
Lastly, is to add the opening to the neck collar and waist strap.
The sleeves look quite long because I used a men's sleeve pattern block so that the user has more space in the armhole. I had an idea to put the strap inside so that if the user wants it shorter they can clip the strap on the outer arm holder to fold it.
DESIGN #02
For this design, I'll be using two jackets, one is a blazer and one is a long jacket.
Firstly, I did the skirt first, because I already had the pattern prepared and it was easy since it was a basic fitted skirt.
I started off by dismantling the two jackets and draping the silhouette onto the mannequin along with the straps and buckles.
 |
| Back |
 |
| Side |
 |
| Front |
After finalizing the design, I sew all of the pieces together. For the skirt, I decided to make it an extra piece, by adding a black leather belt.


The design needed lining inside so I used this purple dual-tone fabric that is for the skirt and the flared asymmetrical sleeve.

After completing everything, I sew the buckles and leather belt together.


Lastly, I did the sleeve flap. I decided to make my own pattern for the flap. I did the draping method to make the flap. After doing the flap, I used the jacket material for the outer and another jacket lining to make the inner. I sew the whole pattern together with the sleeve.


I added shoulder pads to the sleeve flap to make it puffy. And stitch the hemline of the flap (inside) closed.
DESIGN #03
For this design, I'll be using a black blazer with no lining and adding parts from another jacket.
I made the pants first before the top because I already had the pattern for the pants. These pants are supposedly low-waisted. I attached the base of the pants together and inserted the pockets
 |
| Back |
 |
| Front |
Next, I add in the extra details like the fly and waistband.
 |
| Fly |
 |
| Front Waistband |
 |
| Back Waistband |
After completing the bottom, I moved to the top. I started draping the top.


While I was draping the jacket, I realise the sleeve lining in the blazer could be detailed as bat wings on the top and the sleeves give the top like a scarf collar. I sew the base of the jacket first. After sewing it completely I notice these things. I added buttons inside and outside so that the user can button up these either inner or outer.

I substitute the bat wings fabric with this black dual-tone fabric, which I used in my 1st design.
 |
| Bat Wings |
Lastly is the collar, Mr Riza advised me to make a pattern for the collar so that the garment doesn't entirely consist of parts formed together to form a full garment. For the collar, I asked Mr Riza for suggestions and he suggested this flap collar. We made the pattern together.
 |
| Front |
 |
| Back |
 |
| Pattern of Collar |
For the outer side, I used the jacket fabric whilst on the inside I used the dual-tone black fabric.

I needed to add interfacing to the collar. I used jacket interfacing.

Lastly here is the completed product. I also added these details from the jacket to the collar.

I asked my model to do a fitting for this garment, to see if it fits her or not.
 |
| Front |
 |
| Side |
 |
| Back |
The pants needed a little bit of adjustment. So I have to add darts from the back, to make it fit.
I wanted to add more details to the jacket as I didn't quite like the idea of putting buttons on the collar.
DESIGN #04
Since the pants pattern is the same as design #03, I completed the pants first before the top. However the pockets in the first pants design were quite small, so I adjust the length of the pockets for these pants. I used a green dual-tone fabric for these pants.

Now for the top. I started off by draping it again on the mannequin. Since the silhouette of the garment appears to be big and puffy, I decided to use this parachute fabric to re-create that silhouette. Again, I used two jackets one is the parachute jacket whilst the other is the jacket base from design #03 (the dismantled parts to create detail on design #03).
There was a hoody on the parachute jacket and I replaced it as a puffy turtleneck instead. As for the sleeves, I removed them and made an inner pocket on both sides. And for the zipper opening, I re-create the armhole to be there instead.


I had an extra zipper, so I thought of using it as the opening at the back.

I decided to make detachable sleeves for this design. The sleeves, which I dismantled from the parachute garment, I reused them and did a sleeve pattern out of it. I used the dual-tone fabric green color as the lining of the sleeve.
I added black snap buttons onto the sleeve, as it achieves the detachable objective.
For the hemline of the garment in front, I decided to add black straps with D-rings, for design purposes.
WED [07/12]
On the presentation day, Mr JR and Mr Riza assessed my project and garment outcomes.
FEEDBACK
By: Mr JR & Riza
"I really love your designs here, I love the silhouettes and how you've come up with different silhouettes for each look. The concept is also good, I can see the use of futuristic and tech ware garments included however your focus on the target market should be more clarified or detailed because you're designing garments for those heart diseases patient to get back to being active so that they are able to work, this pushes me to visual that obese people can wear this garment. I think the device is good, as it isn't too heavy, or bulky. You also mention that you're creating workwear, I don't quite see the formality of workwear in your design. Workwear has it's own formality, you have to be able to see if your design is suitable for workwear environment."
FEEDBACK
By: Dr Thomas & Nano-Textile people
"I think that you should have done more research in your target market because unlike females, males are more likely to get heart disease but you must stress the importance of awareness for women having heart disease. The same comment as Mr JR, hearing your target market habits makes me visual that these garments can also be worn by obese people. It would be better if you had plus-size models so that you can showcase your target market more clearly. As for the device, I think it is fairly good, it isn't too heavy and bulky and the inner top functions well with the device embedded to monitor the user."
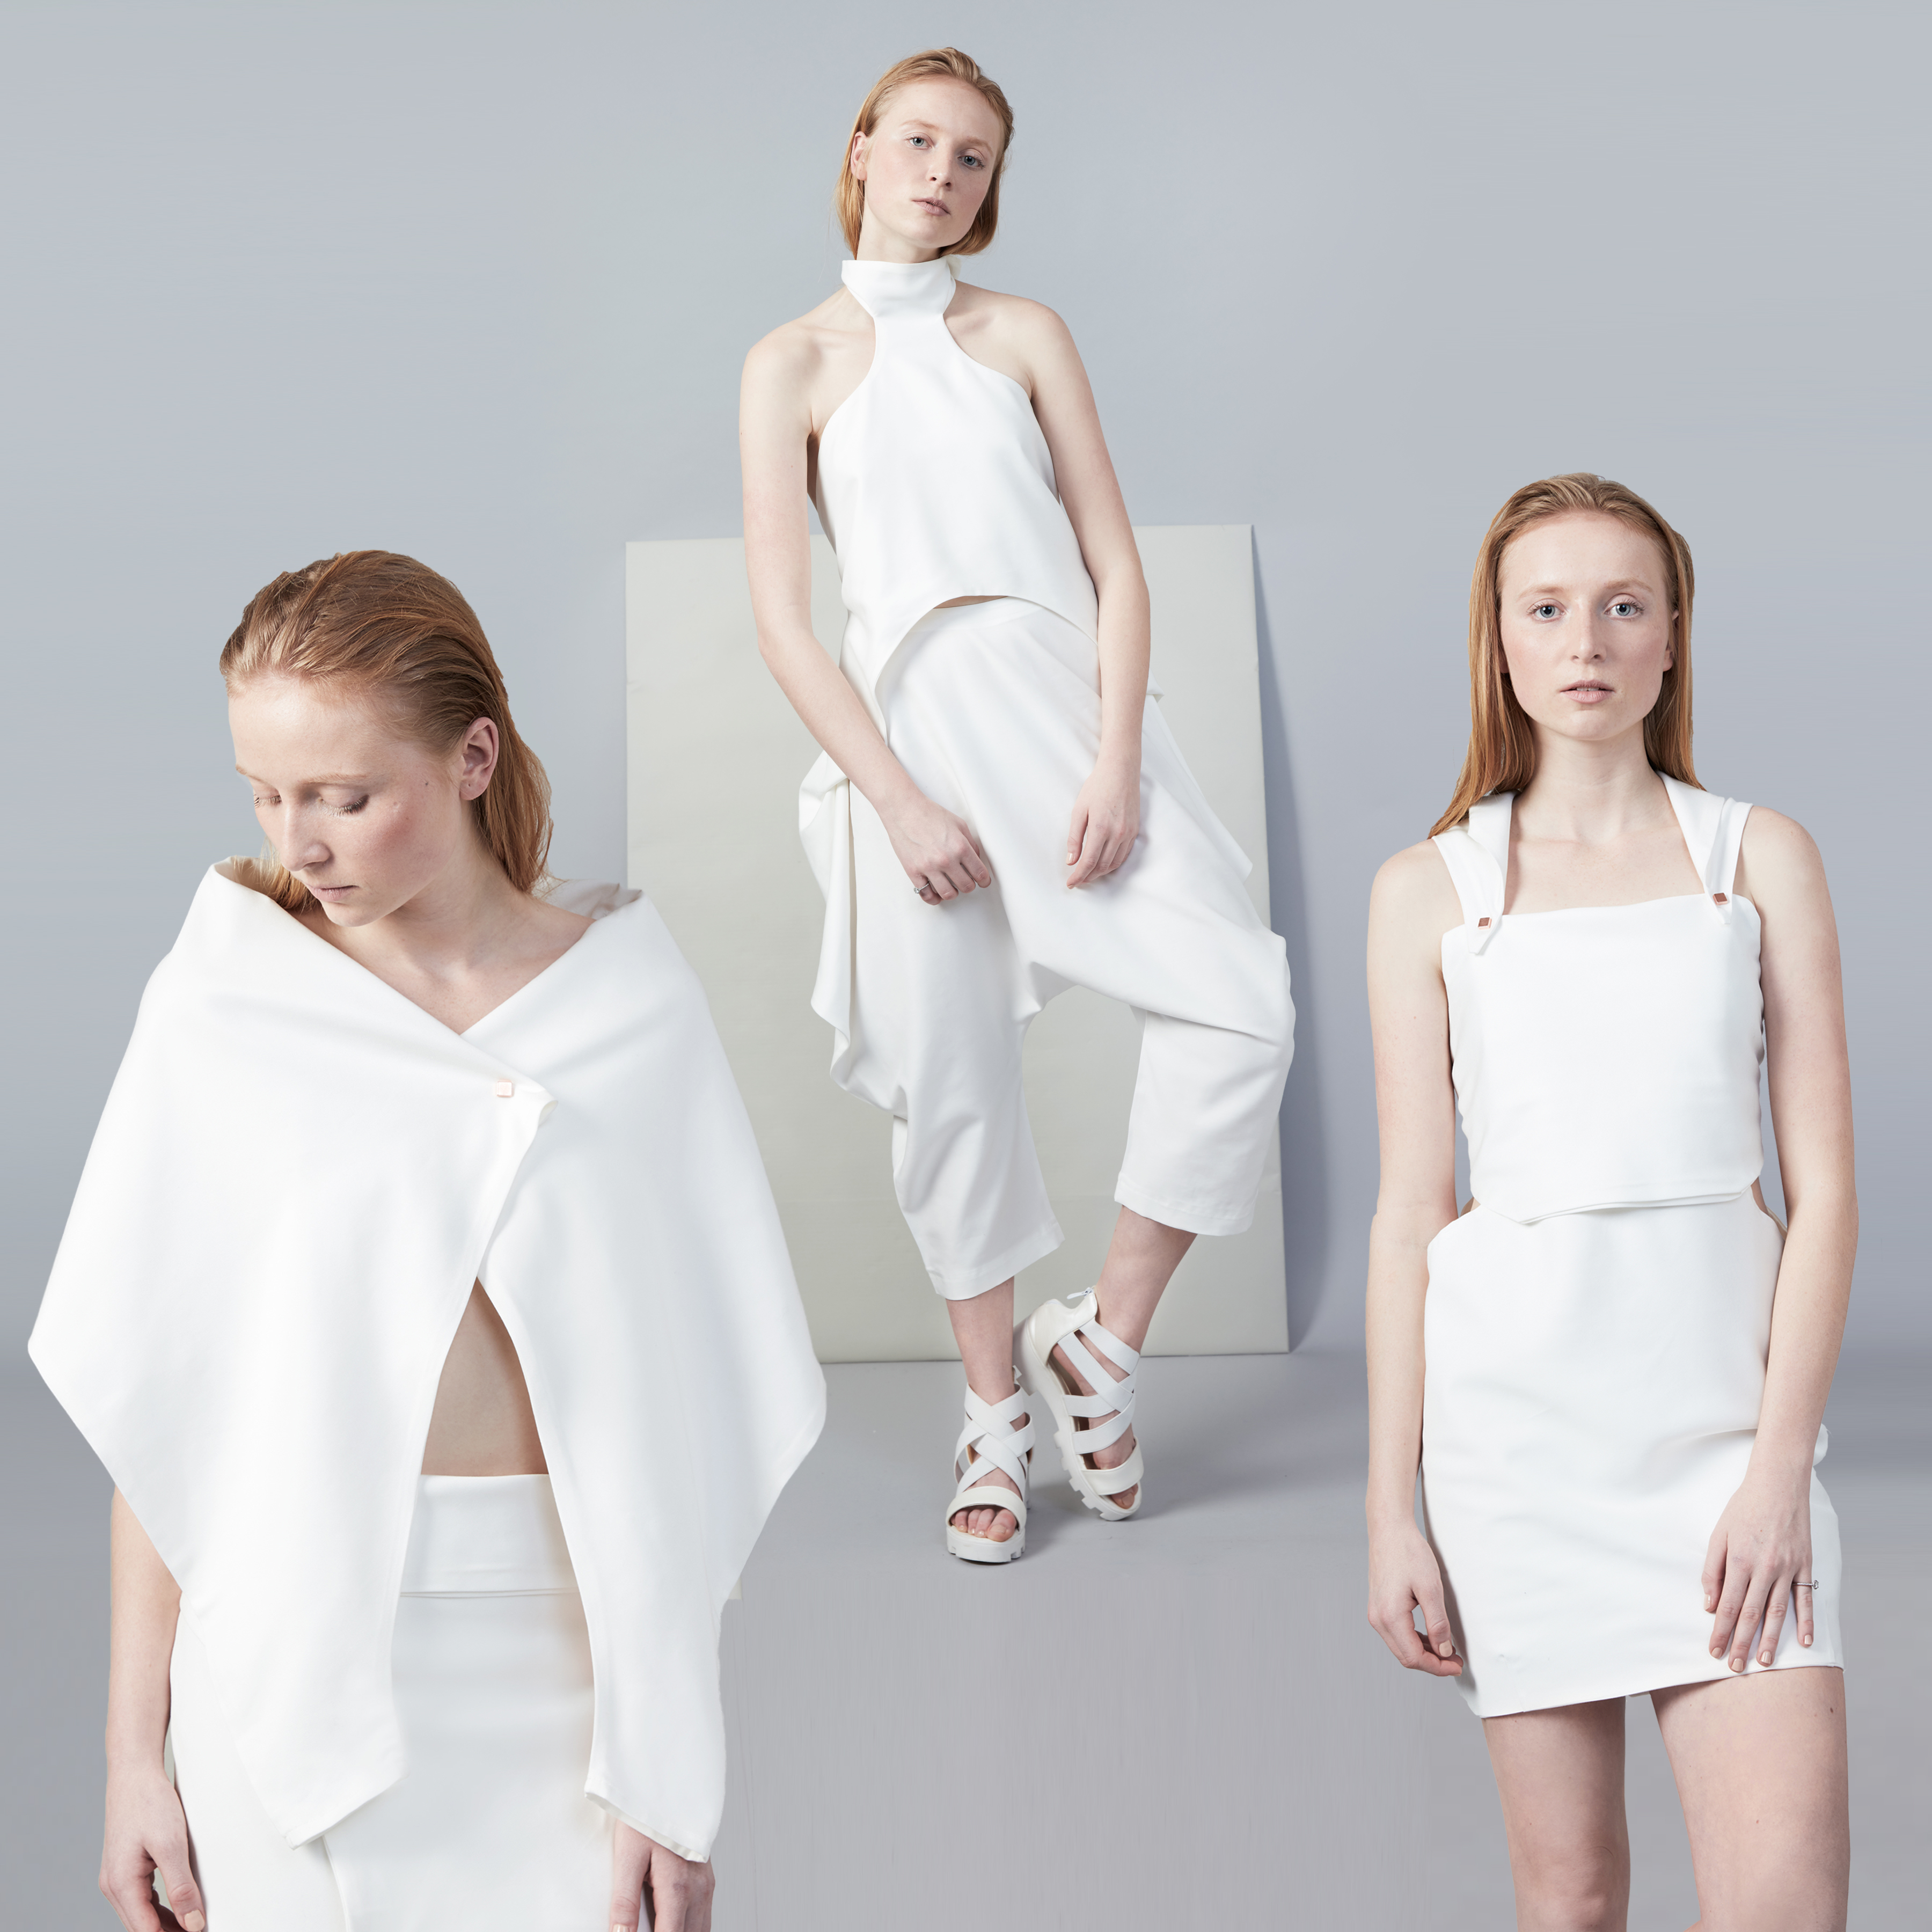
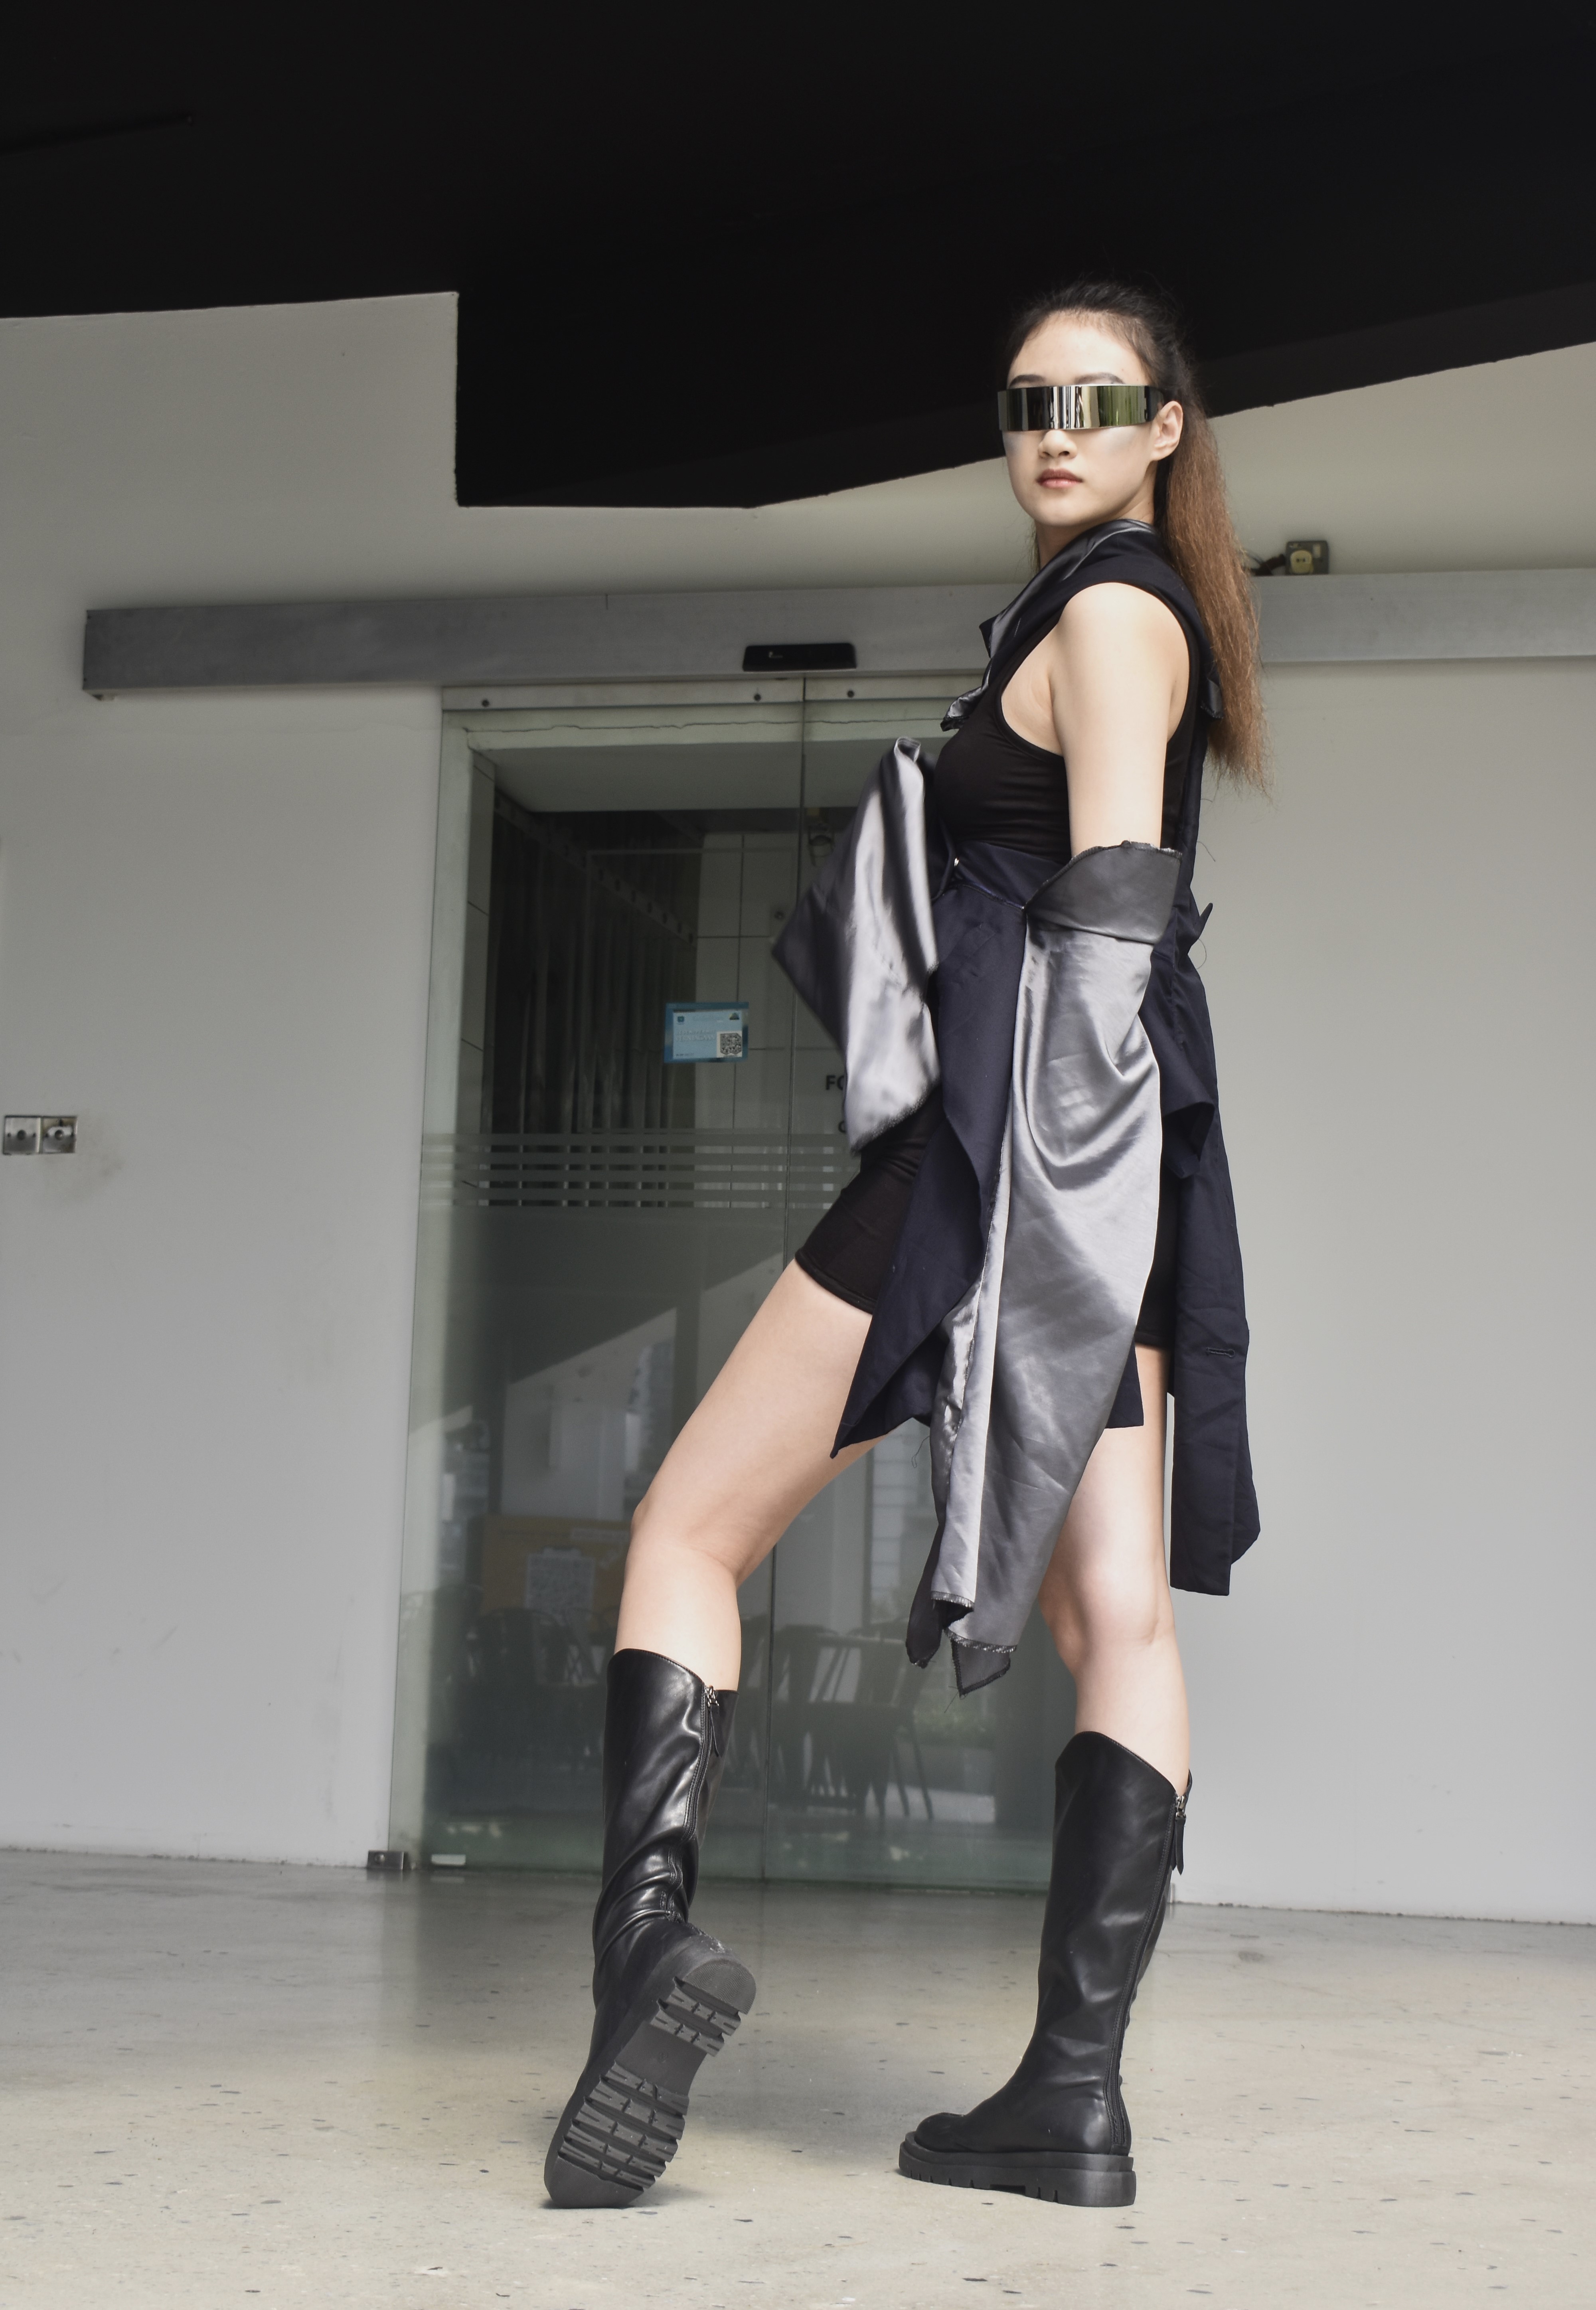
FINAL OUTCOME
Here are the final outcomes of the four finalized garments for Digital Health Fashion.

____________________________________________________
DESIGN #01


DESIGN #02


DESIGN #03


DESIGN #04


Comments
Post a Comment